
Saturday, November 4, 2017
Saturday, April 21, 2012
Baby Girl Headbands Tutorial
My little granddaughter is due in 2 weeks (ahhhhh!!!!! the excitement!!!!!) and the crafty bug has hit hard! Fortunately, my neighborhood Jo-Ann store finally re-opened a few days ago with everything brand spanking new and stocked to max! A dream store come true. So I packed up my shopping basket with ribbon, elastic, and little flower do-dads to make some baby headbands, and here's what I came up with in about two hours...

Are you thinking of making some for a sweet little one? Would you like to know how I made them? Read on.
The hardest part was finding the right head measurement, since my baby granddaughter is still swimming around in her mommy's womb and not available for a fitting. But after some clicking around on the internet, the consensus seems to be that a newborn to 3-month baby should need a headband that measures about 14 1/2" - 15". So that's what I went with.
The tools I used were a sewing machine (with white thread), glue gun, scissors, and needle and thread.
My materials were simply various stretchy bands and pre-made little fabric flowers from Jo-Ann, that were quite reasonably priced. I also purchased two 7" lengths of wide pleated ribbon to make a couple of my own flowers.
Here's an example of how I made a headband.

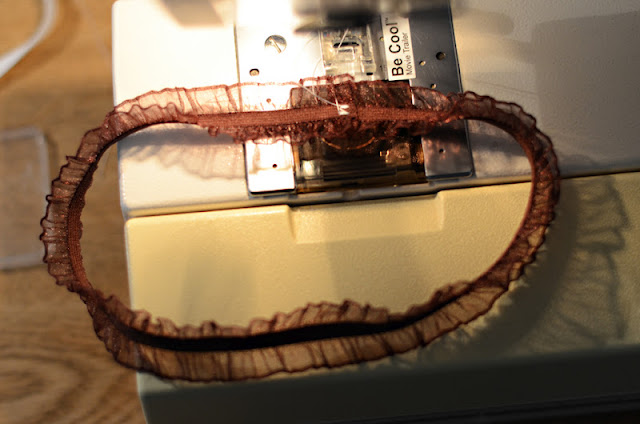
1 - First, I measured a 16" ish length of stretchy ribbon. That allows me an overlap of about 1/4" to 1/2" to sew the ends together. Stretchy is important!

2 - Getting ready to sew the ends together, I pinned my ends with a little overlap.

3 - I put my machine in zig-zag mode with a zero-length stitch. So basically, it just tacks it in place. And I tacked it a couple of times.

4 - Next, I simply used my glue gun to glue my little flower over the stitching on the band. Above you see a drop of hot glue on the back of my flower. Press it to the band over the stitching and you see that it hides the stitches nicely. And ta-da! That's it.


Here's my cute little model wearing my creation. That's basically how I made all of the little-flower headbands. Couldn't be easier!
Stay tuned to see how I made the big flowers - it is soooo easy with the right ribbon!
But first, here are some variations of my little-flower headbands.


 This one is actually three little rose buds hot-glued together.
Now, for the big flowers! These are so easy!...

1 - I found some pleated ribbon like this...

This is about 7"-8". That's all you need.

2 - Fold over about 1/4" and secure the ends with hot glue. Above you are looking at the WRONG side of the ribbon.

3 - Starting in the center, spiral the ribbon around in the shape you like. You want the RIGHT side of the ribbon to show. Hold it there with one hand, and get your glue gun in the other hand. Start gluing both in the center front and the back to secure the ribbon in a flower shape. Be careful not to let strings of hot glue land on your flower!

(Above) Here's what it looks like from the back glued together. I just have a little left to do.
4 - When you're done, and while the glue is still warm, mold your flower so it lays flat-ish.

5 - I chose to sew my flower to my headband with a needle and thread, rather than glue it. My band is rather delicate and I thought thread would hold the flower better. Here is the white version of this flower.

6 - To finish the center of the big flower, I glued in a pretty little flower.

And there you have it!
The next version is the ric-rac headband. I really like the green ric-rac and I found the cutest red polka-dot ribbon flower that was pre-made. The problem is that ric-rac isn't stretchy. So my solution is to add a bit of elastic at the back for stretch. I'm taking the chance that my little granddaughter will have hair in the back to cover the elastic portion. We shall see!
Here's what it will look like...so cute...

And here's how I made it...
 1 - I measured a length of ric-rac about 15" and then I finished the ends by hot gluing them under about 1/4". Next I cut a piece of 1/8" elastic about 3 1/2" to add some stretch to the band.

2 - Hot glue the elastic to the ends of the ric-rac. It's a little longer than the original 15" measurement - but that measurement assumes there is more stretch. (I can always adjust it for fit when Baby Granddaughter is born.) The elastic portion will be the bottom where the baby's hair will cover it.
3 - In the center top, hot glue your little flower to the ric-rac. And ta-da!

I LOVE the ric-rac look!
There you have it...some fun ideas and easy directions for little baby headbands!

Happy sewing and hot gluing! ~CJ

Are you thinking of making some for a sweet little one? Would you like to know how I made them? Read on.
The hardest part was finding the right head measurement, since my baby granddaughter is still swimming around in her mommy's womb and not available for a fitting. But after some clicking around on the internet, the consensus seems to be that a newborn to 3-month baby should need a headband that measures about 14 1/2" - 15". So that's what I went with.
The tools I used were a sewing machine (with white thread), glue gun, scissors, and needle and thread.
My materials were simply various stretchy bands and pre-made little fabric flowers from Jo-Ann, that were quite reasonably priced. I also purchased two 7" lengths of wide pleated ribbon to make a couple of my own flowers.
Here's an example of how I made a headband.

1 - First, I measured a 16" ish length of stretchy ribbon. That allows me an overlap of about 1/4" to 1/2" to sew the ends together. Stretchy is important!

2 - Getting ready to sew the ends together, I pinned my ends with a little overlap.

3 - I put my machine in zig-zag mode with a zero-length stitch. So basically, it just tacks it in place. And I tacked it a couple of times.


4 - Next, I simply used my glue gun to glue my little flower over the stitching on the band. Above you see a drop of hot glue on the back of my flower. Press it to the band over the stitching and you see that it hides the stitches nicely. And ta-da! That's it.


Here's my cute little model wearing my creation. That's basically how I made all of the little-flower headbands. Couldn't be easier!
Stay tuned to see how I made the big flowers - it is soooo easy with the right ribbon!
But first, here are some variations of my little-flower headbands.


Now, for the big flowers! These are so easy!...

1 - I found some pleated ribbon like this...

This is about 7"-8". That's all you need.

2 - Fold over about 1/4" and secure the ends with hot glue. Above you are looking at the WRONG side of the ribbon.

3 - Starting in the center, spiral the ribbon around in the shape you like. You want the RIGHT side of the ribbon to show. Hold it there with one hand, and get your glue gun in the other hand. Start gluing both in the center front and the back to secure the ribbon in a flower shape. Be careful not to let strings of hot glue land on your flower!

(Above) Here's what it looks like from the back glued together. I just have a little left to do.
4 - When you're done, and while the glue is still warm, mold your flower so it lays flat-ish.

5 - I chose to sew my flower to my headband with a needle and thread, rather than glue it. My band is rather delicate and I thought thread would hold the flower better. Here is the white version of this flower.

6 - To finish the center of the big flower, I glued in a pretty little flower.

And there you have it!
The next version is the ric-rac headband. I really like the green ric-rac and I found the cutest red polka-dot ribbon flower that was pre-made. The problem is that ric-rac isn't stretchy. So my solution is to add a bit of elastic at the back for stretch. I'm taking the chance that my little granddaughter will have hair in the back to cover the elastic portion. We shall see!
Here's what it will look like...so cute...

And here's how I made it...


2 - Hot glue the elastic to the ends of the ric-rac. It's a little longer than the original 15" measurement - but that measurement assumes there is more stretch. (I can always adjust it for fit when Baby Granddaughter is born.) The elastic portion will be the bottom where the baby's hair will cover it.
3 - In the center top, hot glue your little flower to the ric-rac. And ta-da!

I LOVE the ric-rac look!
There you have it...some fun ideas and easy directions for little baby headbands!

Happy sewing and hot gluing! ~CJ
Monday, November 21, 2011
Taking a Break
I look at my last post date of September 26, and I wonder where the time has gone. I've been silent but busy for the past couple of months. Have you ever found something you love to do so much that you can't seem to focus on anything else? That's how I felt about knitting last year at this time. It grabbed me and held me all winter long. But this year, it's something else that's taken over - taking and editing photos. It's got me good! You can see some of my work at my photography blog.
Anyway, I plan to be back on Sunflower Way a little more regularly when my photo obsession settles down a bit. With Christmas around the corner, I'm starting to think about some yarny gift ideas. But I better not wait too long, right?! Oh, and I have a new grand baby due next spring, and that means the crafty me is going to kick in gear as soon as the he- or she-ness of the little one is discovered! So I hope to be back soon with a plan or at least a sneak peek a the beginning of some projects. But I'm still here. Just wanted to throw that out to blogland.
In the meantime, I leave you with a photo from my silent time - my little grandson - taking a little break from running, jumping, pedaling, and playing. Yeah, I've been taking a break, too, clicking away at this little man. Enjoy. ~CJ~

Monday, September 26, 2011
Benches
I must have a fascination for benches, because my photo collection is full of bench pictures. I like to see their lines, curves, colors, and materials. That I do know. For something so simple - a seat with something to hold it up - there are so many different ways of making it. It makes sense, because that's what art does...it takes something ordinary and turns it into something unique and interesting to look at (and use!). And then someone places it in its own special setting, and wah-la! It catches my eye in my viewfinder! So, for whatever reason, these benches called out to me somewhere along my paths and here they are, in all their uniqueness - just waiting to be sat on.


Thursday, September 15, 2011
Navajo Bridge, Northern Arizona
It seems I've been blogging about places I've visited this summer instead of crafty, stitchy, knitty projects I might be working on. The truth is, I have been taking a bit of a break from the studio while the days are long and warm.
Recently, I took a road trip to Flagstaff, Arizona to visit my sister and her family. On the way home I chose to take the alternate route in northern Arizona that goes over the eastern tip of the Grand Canyon via Navajo Bridge.

It was a warm day and the sky was magnificent; an afternoon summer storm on its way. The Colorado River is hundreds of feet below. On the west are the Vermilion Cliffs, and on the east are the Echo Cliffs.

There are actually two bridges. The first bridge that was built isn't wide enough for today's traffic and trucks, so a second bridge was built. That's what you see in the photo above.
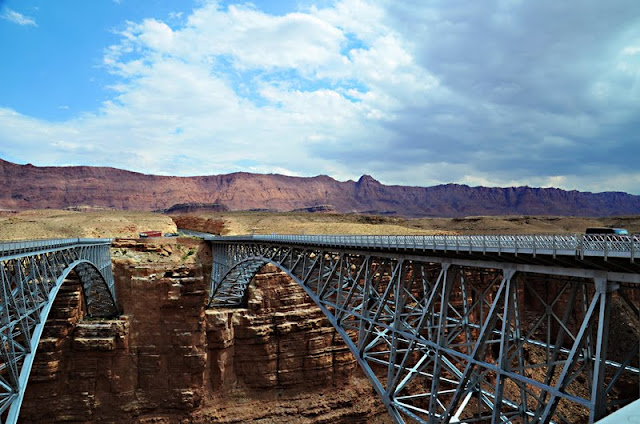
The first bridge on the left above is reserved just for pedestrian traffic. For many years as I've traveled back and forth to visit family in Arizona, I've stopped here and walked the bridge, marveling at the Colorado River below. It's a fun detour. Those are the Echo Cliffs in the background above.
 This is looking west at the pink-tinted Vermilion Cliffs.

And this is the traditional favorite photo that I always take from the bridge, looking north, with the Echo Cliffs on the right. As you drive to Navajo Bridge from the flatlands, you really have no inkling of what lies below - the deep gorge cut by the Colorado River. It's simply amazing.

It wasn't long after I passed through here that the rain began and followed me most of the way home to Bountiful, Utah, just north of Salt Lake City. The sky for most of the drive was filled with changing clouds and colors with the summer storm - truly remarkable. I heart road trips! ~CJ~
Recently, I took a road trip to Flagstaff, Arizona to visit my sister and her family. On the way home I chose to take the alternate route in northern Arizona that goes over the eastern tip of the Grand Canyon via Navajo Bridge.

It was a warm day and the sky was magnificent; an afternoon summer storm on its way. The Colorado River is hundreds of feet below. On the west are the Vermilion Cliffs, and on the east are the Echo Cliffs.

There are actually two bridges. The first bridge that was built isn't wide enough for today's traffic and trucks, so a second bridge was built. That's what you see in the photo above.

The first bridge on the left above is reserved just for pedestrian traffic. For many years as I've traveled back and forth to visit family in Arizona, I've stopped here and walked the bridge, marveling at the Colorado River below. It's a fun detour. Those are the Echo Cliffs in the background above.


And this is the traditional favorite photo that I always take from the bridge, looking north, with the Echo Cliffs on the right. As you drive to Navajo Bridge from the flatlands, you really have no inkling of what lies below - the deep gorge cut by the Colorado River. It's simply amazing.

It wasn't long after I passed through here that the rain began and followed me most of the way home to Bountiful, Utah, just north of Salt Lake City. The sky for most of the drive was filled with changing clouds and colors with the summer storm - truly remarkable. I heart road trips! ~CJ~
Tuesday, August 30, 2011
Downtown Salt Lake City
As wonderful as my jaunts into the country are, I can't escape the city, nor would I want to for too long. Downtown Salt Lake City is beautiful, and it's getting more and more exciting as construction continues with the huge Downtown Rising project. For my job recently, I spent a day downtown in the Zions Bank Building up on the 18th floor, which has a magnificent view of the city - south, west, and north. Of course, with a photo opp like that, I made sure to have my camera with me.
 Looking north, here is the Joseph Smith Memorial Building in front, with the towering Church Office Building behind it, and further back is the Utah State Capitol. Yes, that's a helicopter flying by.


 I love this statue of a mom with her children, which is one of many statues throughout Temple Square depicting our church's history and beliefs.
 This is a partial view of the Conference Center across the reflecting pool.
As a member of the LDS faith, Temple Square holds a special place in my heart. There's a wonderful and calming spirit there that I can't help feel as I walk around. Time seems to stand still.
After weddings take place in the temple, newly married couples come outside and are joined by groups of family and friends for celebration photos around the temple. Everyone is so happy. I caught the tail end of a wedding as I was walking around...

For visitors not of the LDS faith, there are volunteer missionaries who give tours and are glad to answer questions. If you're reading this and would like to know more, you can start with this website.
 This guy guards the Lion House above it's door.
 This is the Beehive House and its garden. I LOVE the old fashioned garden!

And this is where I was spending my day at work, at the Zions Bank Building...up on the top floor (just to the right of the letter K in Zions Bank!).

Here is the view of the city looking south - so many changes in the past year or so. The walkway connecting both sides of the street is one of the cool new additions that will be opening soon.
I hope you enjoyed this little tour of the heart of Salt Lake City! ~CJ~


This is one of my favorite photos. It was a bit of a surprise when I looked at the downloaded photo on my computer and saw the flag from the Joseph Smith Memorial Building waving in front of the Utah Capitol. It's amazing what a telephoto lens can do! I cropped in pretty tight to get this layout. It looks like I photoshopped the flag in, I know, but that flag is the real thing...believe me!

And here is the elegant Salt Lake Temple and surrounding Temple Square. That's the famous Tabernacle (as in the Tabernacle Choir) on the left and the enormous Conference Center behind the temple to the right.
After my meetings I walked around temple square clicking away with my camera. Every time I'm there, I seem to find new views and angles to photograph. The old (and new) architecture is amazing, and I never tire of it.


The gardens this time of year are to fall in love with!


This is the Eagle Gate Plaza. And here is the Church Office Building again.


As a member of the LDS faith, Temple Square holds a special place in my heart. There's a wonderful and calming spirit there that I can't help feel as I walk around. Time seems to stand still.
After weddings take place in the temple, newly married couples come outside and are joined by groups of family and friends for celebration photos around the temple. Everyone is so happy. I caught the tail end of a wedding as I was walking around...

For visitors not of the LDS faith, there are volunteer missionaries who give tours and are glad to answer questions. If you're reading this and would like to know more, you can start with this website.


And this is where I was spending my day at work, at the Zions Bank Building...up on the top floor (just to the right of the letter K in Zions Bank!).

Here is the view of the city looking south - so many changes in the past year or so. The walkway connecting both sides of the street is one of the cool new additions that will be opening soon.
I hope you enjoyed this little tour of the heart of Salt Lake City! ~CJ~
Subscribe to:
Posts (Atom)